Google Analytics is a go-to tool for tracking and analyzing readers who visit your website. It’s free and it offers a lot of powerful analytics features, which makes it no wonder that it is used by a large majority of independent publishers.
But unlocking the full power of Google Analytics can be tricky as it’s not always intuitive or easy to navigate. That’s why we developed a full guide to setting up Google Analytics for small publishers that takes you through all of the most key features step by step.
In this post, however, we will stick to just two of the most important features that Google Analytics offers: Events and Goals.
We will show you why Events and Goals are so important and how you can get them set up in simple terms so you can understand what actions are driving your conversions on your site. Let’s get started.
What are Google Analytics Events and Goals
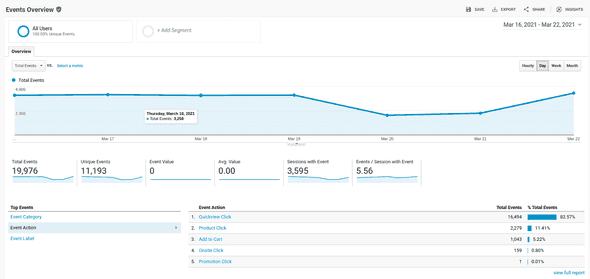
Google Analytics Events are essentially actions that users take on a page of your website that you instruct Google Analytics to take note of. For example, you want to know every time someone clicks a specific button on your website, so you can set this up as an Event in Google Analytics that will fire every time someone clicks on that button.
You can then monitor over time, similar to sessions and users and your other standard metrics, how many readers per day are clicking on that button.
The way to understand Google Analytics Goals, is that they are a subset of Events - all Goals are Events, but not all Events are Goals. Or in other words, you will always have more Events than Goals.
This is because a Goal is an Event that you give special emphasis to - it is an objective that you want your user to take on your site. Again, back to our example of clicking on a button on a page of your website. Let’s say now that you have two buttons: one button is a link to another site and another is to subscribe to your newsletter.
You want to know how many times a user clicks each button, so you set up Events to fire each time a button is clicked, but you are especially interested to know how many times someone clicks the button to subscribe to your newsletter because this is a key objective you want to achieve from your readers.
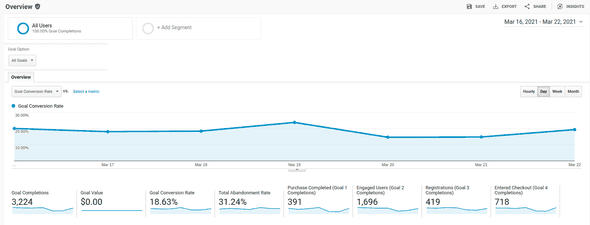
So you specify in Google Analytics, that this Event is a Goal - which then gives you more options for Goal tracking. For example, you can then monitor conversion rates over time - or what percentage of visitors to your site complete a Goal like signing up for your newsletter.
Why Google Analytics Events and Goals are so important
Events and Goals are such an important part of Google Analytics because they allow you to understand conversions. And by understanding conversions, you are able to better understand what content resonates with your readers and what gets them to complete the objectives and goals that you want them to.
For example, by monitoring your Goal Conversion Rate over time, you can see not only what stories you posted to your website drive the most traffic, but also whether or not these stories are productive in bringing you the type of readers that you want. (e.g. readers that complete Goals)
Looking at your conversion rate, you can also understand if you are effectively targeting your users with calls to action that are relevant and appealing. You can change the language in your call to actions and monitor how that impacts your Goal conversion rate. For example, you might find that “Subscribe to our newsletter” works less effectively than “Be the first to get our latest news” in getting people to sign up.
Furthermore, by integrating E-commerce Analytics into your strategy, you can dive deeper into understanding how your products are performing online. This data will enable you to tailor your marketing efforts more precisely, ensuring your products meet your customers’ needs and preferences.
By properly setting up Events and Goals, you will have all the data you need to get insights like these from Google Analytics.
How to set up Events and Goals in Google Analytics
In order to make setting up Events and Goals in Google Analytics as simple as possible, we highly recommend using Google Tag Manager. We explain the full process and why this helps in this guide.
Once you have Google Tag Manager set up on your site, it is really simple to set up Events and Goals without any coding required.
Let’s see how.
Setting up Events
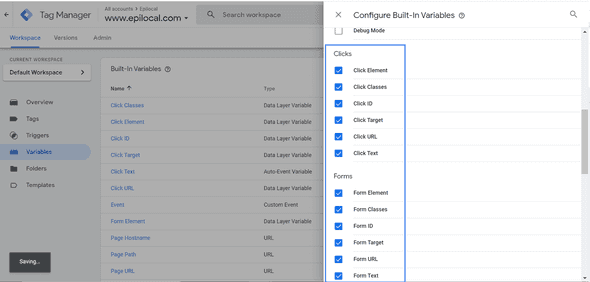
Google Tag Manager actually comes with a lot of what we need built-in, it’s just not turned on by default. So the first thing we need to do is turn on the functions we want - we will do this by going to the Variables tab and selecting Configure under the section Built-In Variables.
This will now open up a menu that lets us choose the different variables that we want to use in Google Tag Manager. What this means is that Google Tag Manager will pull in data based on these criteria. So let’s select everything under the sections “Clicks” and “Forms.”
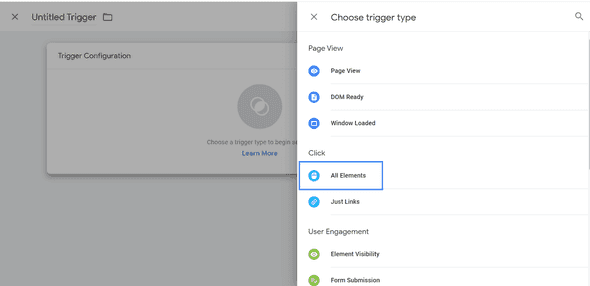
Now, as an example, we want to create an event that will fire every time someone clicks a Subscribe button. This requires setting up what’s called a Trigger in Google Tag Manager. So we will go to the Trigger tab and select new. Then we will instruct it to fire every time an element of the website is clicked.
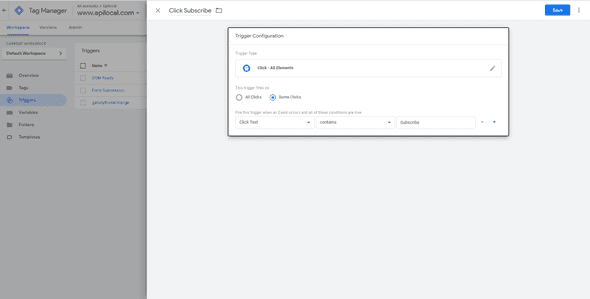
Now we will configure it a bit further, so that it doesn’t fire on every single click on our website. We have the option to filter based on multiple options, so we will select “Click Text” and then specify that it must contain the word “Subscribe.”
Now we have the Trigger set up, we just need to tell Google Tag Manager what to do whenever that Trigger fires. So we will click on the Tag tab and add our Trigger that we just created where it says Triggering.
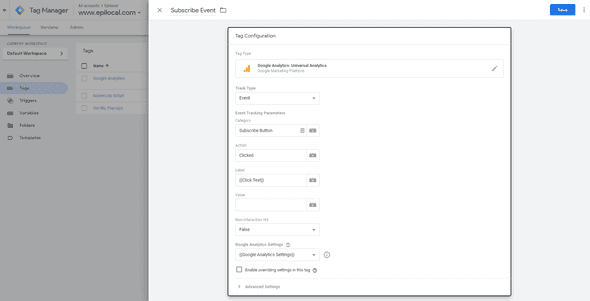
Then we will go to Tag Configuration and pick Google Analytics Universal Analytics.
Here we will go to Track Type and select “Event” which will then ask for values for Category, Action and Label fields. What this is doing is it is specifying which data Google Tag Manager will pass to Google Analytics any time the trigger event is fired.
So for our case, we will use the following values:
- Category: let’s just put “Subscribe Button” as our value - this will tell us in Google Analytics that the Event is a “Subscribe Button” event.
- Action: now we can just write “Clicked” as our value - this will tell us in Google Analytics the Event is that this button is being clicked
- Label: finally for the Label value, let’s put {{ClickText}}. This means that we will be able to see in Google Analytics the actual text inside the button that is being clicked. (in case you have different buttons with different versions of call to action text)
As a last step, under Google Analytics settings, just select {{Google Analytics Settings}} which means everything else you will be keeping according to your default configuration.
Finally under Google Analytics Settings just select {{Google Analytics Settings}} which means everything else will be as you set up previously.
And that’s it, now you should have Events set up. One of the great things about using Google Tag Manager is that you can check if everything is working before deploying. Click “Preview” and then try clicking on your Subscribe Button. You should see your events firing as you click. As long as that works fine, you are good to go ahead and deploy.
Now we just have to set up our Goals in Google Analytics. (no fear, this is even easier!)
Setting up Goals
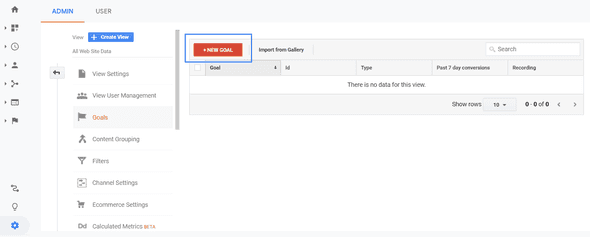
Inside of Google Analytics we will go to the admin dashboard and select Goals and then “New Goal.”
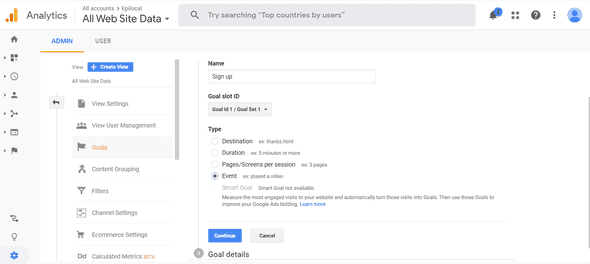
Then we will select Custom Goal, give it a name and say that it is related to an Event. (as we said before, for our purposes, all Goals are Events. Technically that’s a bit of a stretch, as you could also set a Goal for when someone reaches a specific page or stays on your website for a certain amount of time, but we will leave that for another day)
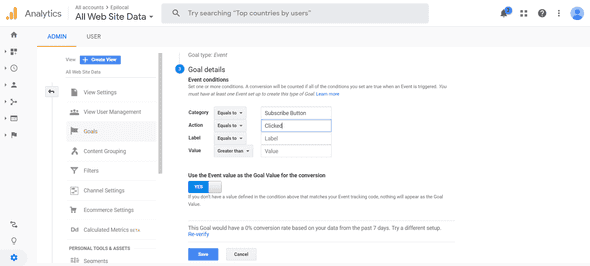
Now we just need to set up the Goals so that the Category and Action match up with the way we configured our Event in Google Tag Manager. So under Category we will put that it equals “Subscribe Button” and under Action we will say that it equals “Clicked.”
This is telling Google Analytics to look for this specific Event, and every time that Event fires it will mark it as a Goal completion.
And that’s all there is to it, you now have Events and Goals set up.
Taking it further
As we mentioned before, once you have Events and Goals set up in Google Analytics, there are a wealth of insights that you can extract from tracking your Goal conversion rate over time. But you can take this even further if you connect your Google Analytics account to Google Data Studio.
Using Google Data Studio’s powerful visualization features, you can create dashboards that make monitoring your Goal conversion rate a breeze. (we show you how you can get started with Google Data Studio here)
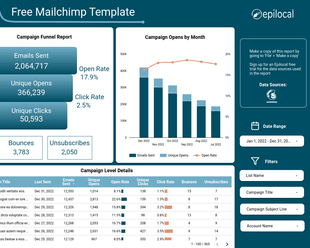
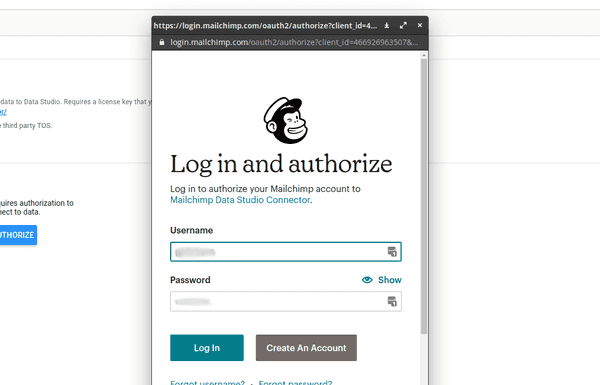
And if you want to take things even further, you can bring in outside data to compare things like newsletter Open Rate from Mailchimp in the same dashboard.
With Google Analytics, there are lots of possibilities for customization once you know your way around a bit - we hope we helped you get a better understanding of Events, Goals and Conversions with this post!
![Setting Up Google Analytics Events and Goals [Step-by-Step Guide]](/static/6f4bb7d7c170d0baa230f84a8f8dbfe4/3b307/google-analytics-on-laptop.jpg)

![Connect Plausible Analytics to Looker Studio [Free Template]](/static/02809ee25af3e099ec53e8c6b0bf26db/b6d36/connect-plausible-ds.png)
