Do you want to use Google Analytics to better understand your audience but you’re not sure how to get everything set up? We’ve created this guide for you where you will learn everything publishers need to know in order to set up Google Analytics and get the most of it.
By the end of this guide you will not only have Google Analytics set up, but you will have access to powerful views of your data that follow the guidelines that Google has developed for their Google News Initiative. It was designed for news publishers but we’ve focused on setting up the most important concepts that can be applied to all types of independent publishers.
We will cover step-by-step the following topics:
Overview of the Tools
Google Analytics
Google Analytics is a free analytics tool that allows you to gather and analyze data about how visitors to your blog or website interact with your content. Based on this information, you can then figure out how to keep them engaged and coming back for more.
Some of the key features of Google Analytics are:
- Free: Google Analytics is offered for free by Google
- Widely used: Because it is such a powerful tool that is offered for free, it is a standard used by websites big and small. As a result, there are tons of blogs and support forums where you can find answers to any issues
- Ready-to-use reports: Google Analytics comes with many ready-made reports that tell you the most important things you need to know about the traffic to your website.
- Powerful customization options: It also has the power to go beyond these basic features with lots of options for customization. (We will see some of the most important customization options for publishers later in this guide)
Google Tag Manager
When running a blog or website, it is often useful to add small pieces of code from various third-party services, such as Google Analytics, in order to track your conversions or traffic to your site. You could do this manually by pasting every piece of code from every service that you use into the HTML of your website, but this gets difficult to manage over time - especially if you are not very technical. Google Tag Manager allows you to manage all of these pieces of code (or snippets as they are commonly called) from a single, easy-to-use dashboard.
Some of the key features of Google Tag Manager are:
- Free to use: Google Tag Manager is another free service offered by Google
- Built-in templates: Google Tag Manager comes with built-in templates for some of the most common snippets you will use, such as Google Analytics and Adwords. (this means you can install these tools on your website with no coding, once you have Google Tag Manager set up)
- Endless customization possibilities: If you are more technical, it also has allows you to inject your own custom code or HTML, which gives an easy way to add lots of customization to your website without touching the core codebase
Installing Google Tag Manager and Google Analytics
We will start by assuming that you already have a Google Analytics and Google Tag Manager account. If you haven’t yet done this, start here for creating a Google Analytics account and here for creating a Google Tag Manager account.
Now, in order for Google Analytics to work, it needs to have a small script added to the top of your website that looks something like this:
What this is doing, is it is just a short program, or script as it is technically called, that runs every time that a page on your website is accessed. And what that script does is it connects with Google Analytics and sends the data about every interaction with your site for aggregation.
You don’t have to understand what that script means, it is just important to know that is how Google Analytics is installed on a website. Typically, there are three different ways that you can do this installation:
- You can manually insert the code into your website
- You can use Google Tag Manager to insert it for you
- If you are using Wordpress, you can use a plugin like MonsterInsights
All three different approaches are doing the same thing: even a Wordpress plugin is just taking the same code and automatically inserting it at the top of your website.
For the purposes of this guide, we are going to be using Google Tag Manager. The reason we prefer to do this, is that Google Tag Manager makes it easy to manage Google Analytics and any other similar scripts that you will add to your website over time. So rather than having to copy and paste directly into your website’s HTML code multiple times, you can just insert the Google Tag Manager code one-time and then manage Google Analytics and any other scripts from there.
So the order will look like this:
- Install Google Tag Manager script directly on your website
- Install Google Analytics through Google Tag Manager
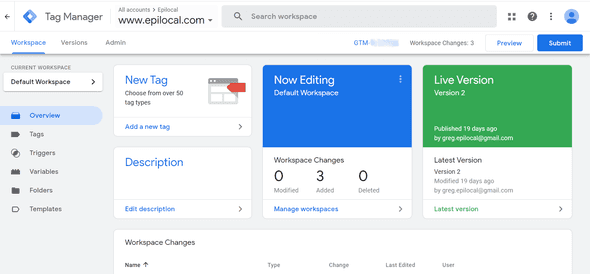
Ok, let’s start with getting Google Tag Manager set up. To begin with, login to your Google Tag Manager account and you should see something that looks like this:
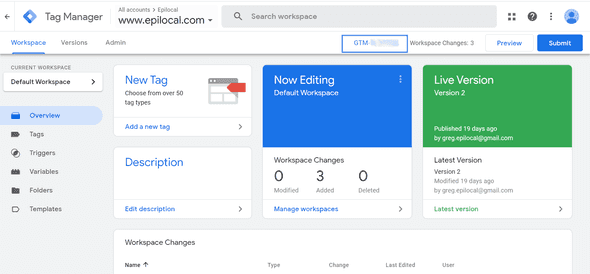
You will now click on your tracking code that has this format: GTM-XXXXXXX.
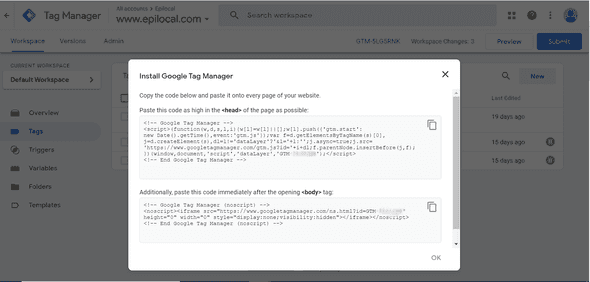
This will give you a pop-up that will show the scripts that need to be installed on your site.
Remember, just like the Google Analytics script we saw above, this is just connecting your website to Google Tag Manager so that it can capture the data from people interacting with your site.
Now, you can either do this installation manually by inserting the script directly into your HTML files or if you are using Wordpress you can use a plugin called Google Tag Manager for Wordpress.
There is a detailed guide on both options for Wordpress users over at wpexplorer.com, although we recommend using the plug-in as we will be using it in the next step.
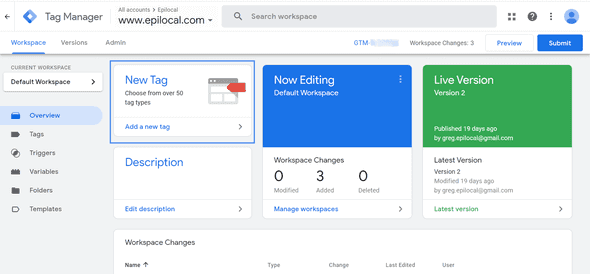
Now the technical part is done, and since you have Google Tag Manager set up, your Google Analytics set up will now be a breeze. Go back to your Google Tag Manager dashboard and click New Tag:
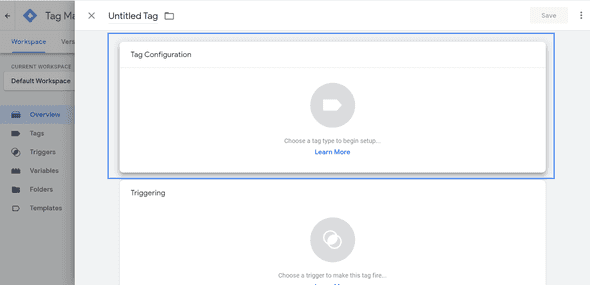
By default it will create a New Tag called “Untitled Tag”. You can name it something that you will easily remember like Google Analytics.
Then we will click on Tag Configuration:
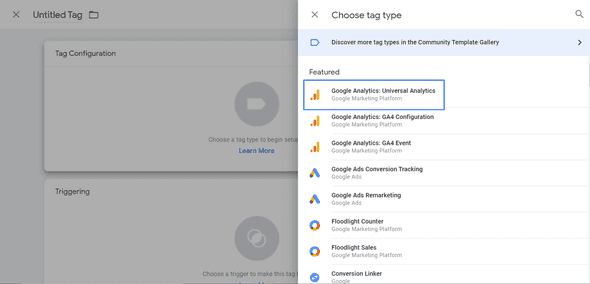
And then click on Google Analytics Universal Analytics:
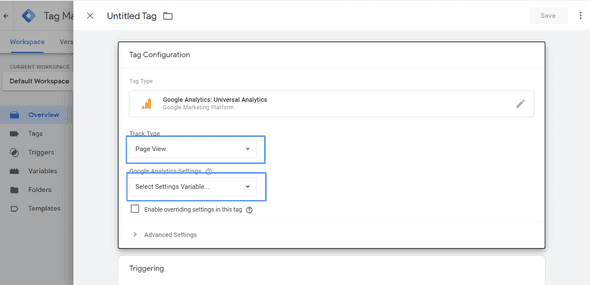
Where it says “Track Type”, leave it set as “Page View.”
Then where it say Google Analytics Settings > Select Settings Variable, select “New Variable” from the drop-down menu.
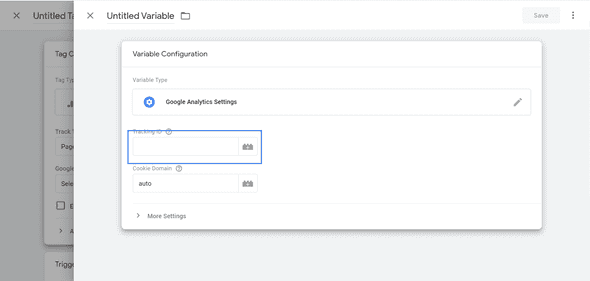
Now you just need to enter in your Google Analytics Tracking ID. You can find in your Google Analytics Dashboard and it looks like this: UA-XXXXXXXXX-X. Then press Save.
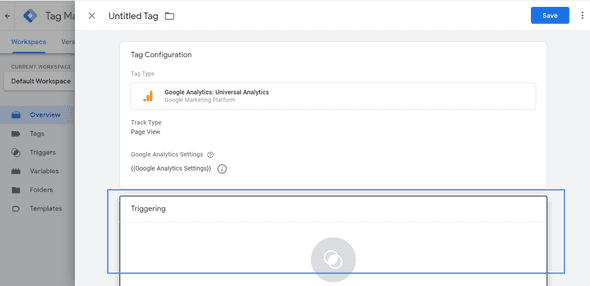
Now that the tag is configured, you just need to tell it when it will trigger - so click on the “Triggering” section.
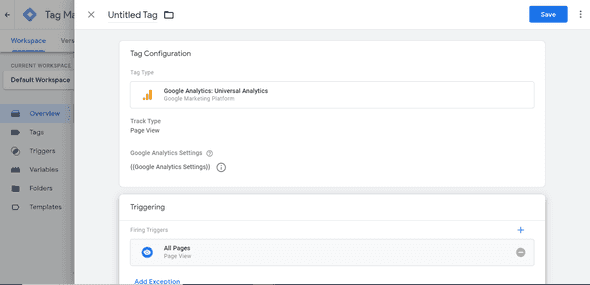
Under the “Triggering” section, there should only be one option which is “All Pages”. Select that and you should end up with a final configuration that looks like this. Click Save.
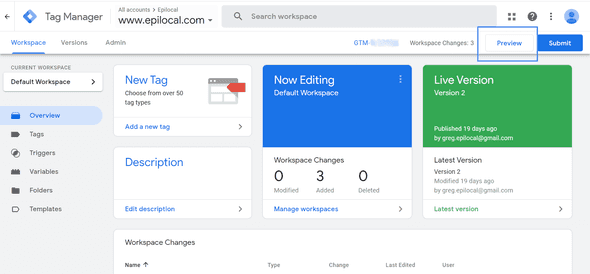
Now that you are back to your dashboard, first you can click Preview to test that everything is working correctly:
If you reload your website, you should see 1 visitor to your site in your Google Analytics dashboard. Then you are ready to press Submit. And that’s it, that’s your initial set up for Google Analytics and Google Tag Manager.
Custom Dimensions
Next we want to enable Custom Dimensions on Google Analytics to better segment our data. What we mean by this is that you will be able to group your data based on how you would like to view it, based on things like:
- Article title
- Author
- Article Category
- Content Type
- Published Date
This data isn’t available by default in Google Analytics, so we have to bring it together with all of your other data by using Google Analytics’ Custom Dimensions. What this means is that essentially we will have to manually pull data from your website and give it to Google Analytics so it can aggregate it with everything else.
Thankfully, since we are using Google Tag Manager this will be pretty simple to set up. It will be a 4-step process:
- Pick the data we want from Wordpress using Google Tag Manager for Wordpress
- Tell Google Tag Manager what data it will receive from Wordpress
- Tell Google Tag Manager to pass the data to Google Analytics
- Define the Custom Dimension names in Google Analytics
Google Tag Manager for Wordpress Set Up
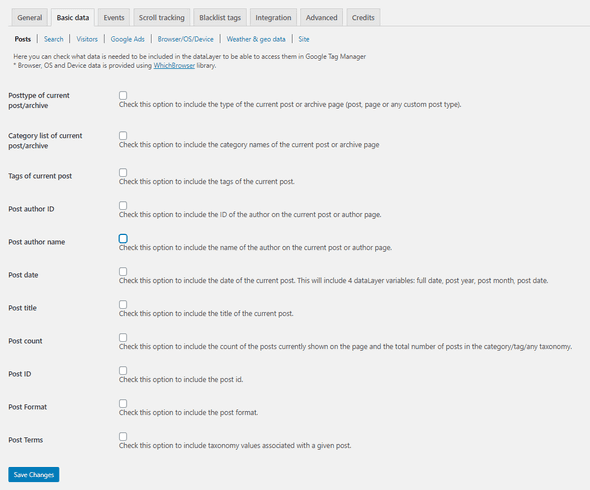
First, let’s go into the Google Tag Manager for Wordpress to see what data fields are available to us to use. So we open up the plugin in the Wordpress admin and go to the Basic data tab:
Here we can see that we have the following additional data from our Wordpress posts that we can pass to Google Tag Manager:
- Type - page, post, other custom
- Category name
- Tags
- Author ID
- Author Name
- Date
- Title
- Count
- Post ID
- Format
- Terms
So let’s think about how we are going to want to segment the data to monitor and adapt our content strategy.
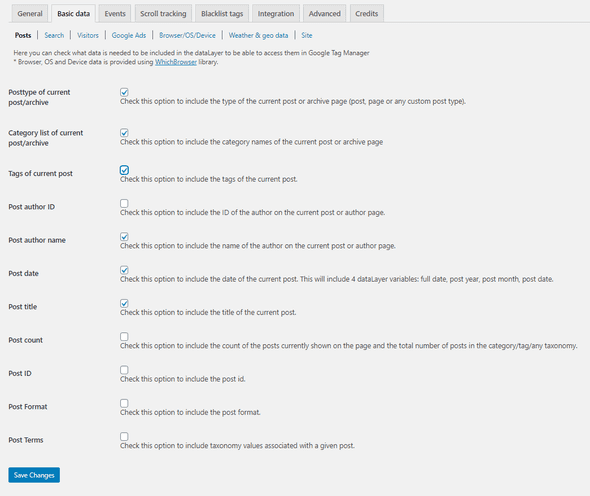
We will want to filter out posts from pages, so let’s check that. Then we will also want to look at our data by Category, Tags, Author, Date and Title so check yes to all of those. The others we won’t use.
Press “Save Changes” and this data will now start flowing into Google Tag Manager.
Pulling Data from Wordpress into Google Tag Manager
Now in Google Tag Manager, we have to make it aware of the data that we are now sending it and tell it what to do with it.
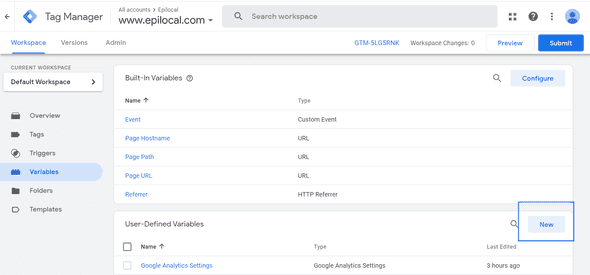
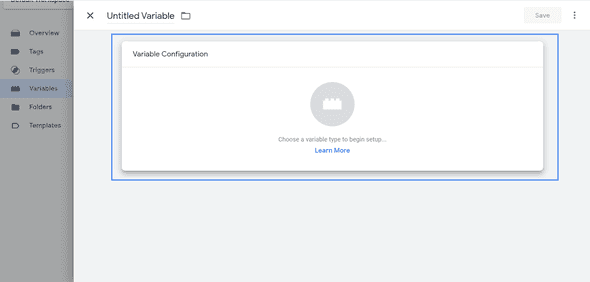
For the first part, we will go to our Google Tag Manager dashboard and click on Variables in the left menu. Then we will click on the “New” button under User-Defined Variables.
Next click on Variable Configuration:
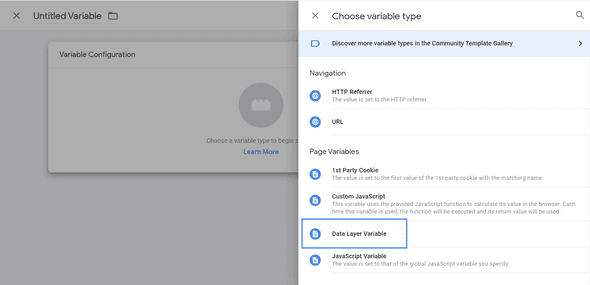
And here we will select Data Layer Variable.
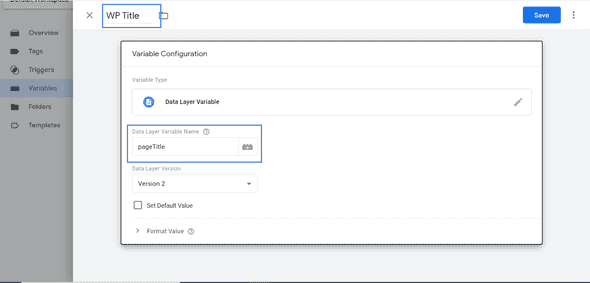
Now we will want to name this new variable something that we will remember, so let’s call it WP Author. Then where it says Data Layer Variable Name we will type in “pageTitle” and press Save.
The reason that we type in pageTitle is that is the name of the data-field that we are receiving from the Wordpress for Google Tag Manager. You can see a full list of the field names here.
Now you will just repeat this same process and create new User-Defined variables for the remaining fields based on the plugin’s field names:
- Type
- Name: WP Type
- Data Variable Name: pagePostType
- Category name
- Name: WP Category
- Data Variable Name: pageCategory
- Tags
- Name: WP Tags
- Data Variable Name: pageAttributes
- Author Name
- Name: WP Author
- Data Variable Name: pagePostAuthor
- Date
- Name: WP Date
- Data Variable Name: pagePostDate
Pushing Data from Google Tag Manager to Google Analytics
Now that Google Tag Manager has the data from Wordpress, you need to tell it to pass this data on to Google Analytics.
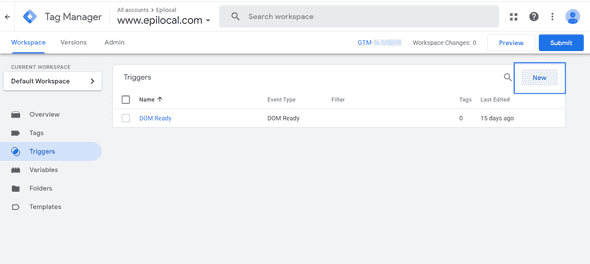
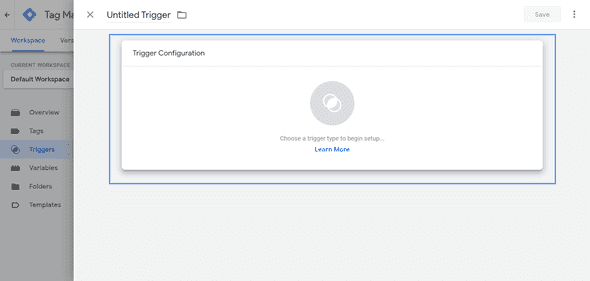
First, we have to tell it when to pass this data on by creating a new Trigger event. And in this case, we will want to pass on the data from Wordpress every time that someone views a Wordpress post.
Now name the Trigger something you will remember, like WP Post View and Click on Trigger Configuration:
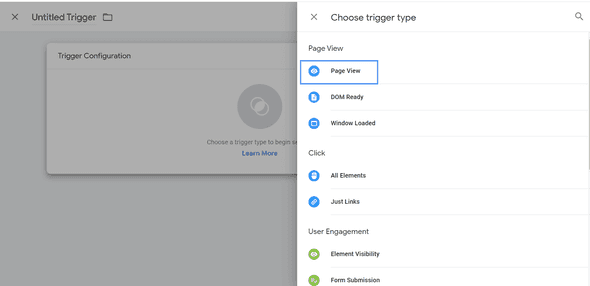
Now we need to tell Google Tag Manager when this trigger will fire, so in this case we want it to be every time a page is viewed, so click on Page View:
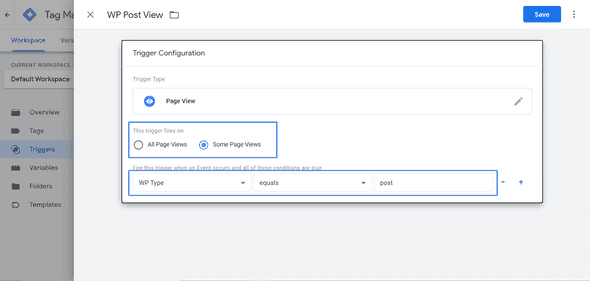
Now that we are in Page View, we want to customize it so that it only fires on Post views rather than Pages or other types of page that we might have set up in Wordpress. This ensures that every time the data is sent, we will have those custom fields we selected before like Author, Tags, etc.
So the way we will do that is we will select “The trigger fires on: Some Page Views.”
And then we can choose the conditions that it fires and we will select when WP Type equals “post”.
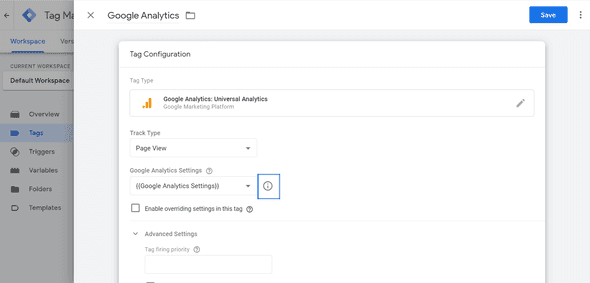
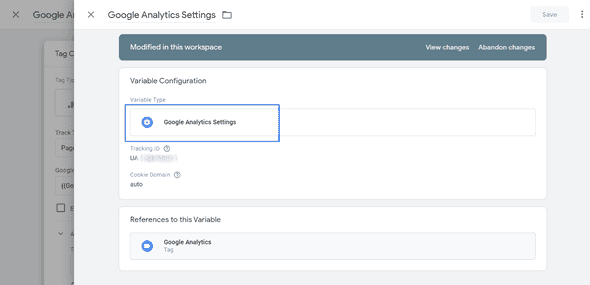
Now we go back to our Tag and we will click on the Google Analytics Settings.
And we will click through to Google Analytics Settings.
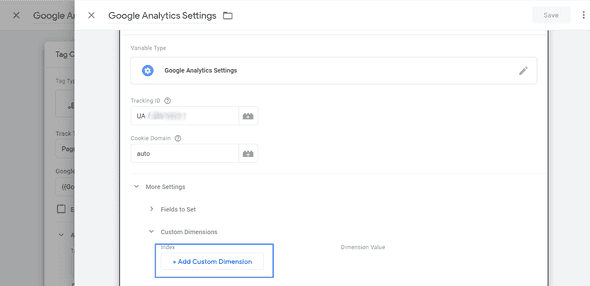
Now we need to add our Custom Dimensions. This is telling Google Tag Manager to pass these custom fields to Google Analytics.
So here we will click “+ Add Custom Dimension.”
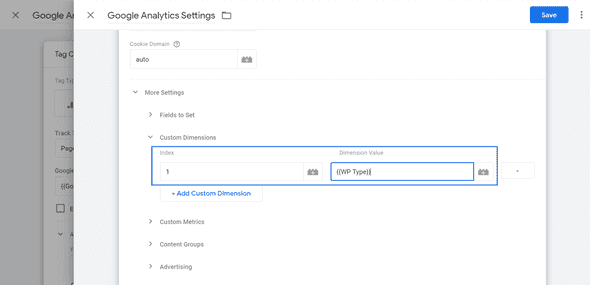
Under Index, this is simply going to be a number counting upwards from 1. So you can just input 1 for your first custom dimension and then pick WP Type from the list of Dimension Values.
Then you will simply repeat that for all of the other custom dimensions: WP Category, WP Tags, etc. Just be sure to remember the order, as you will need that in the next step.
Receiving Data in Google Analytics
Our last step is to tell Google Analytics which Custom Dimensions it will receive and then tell it what to do with them.
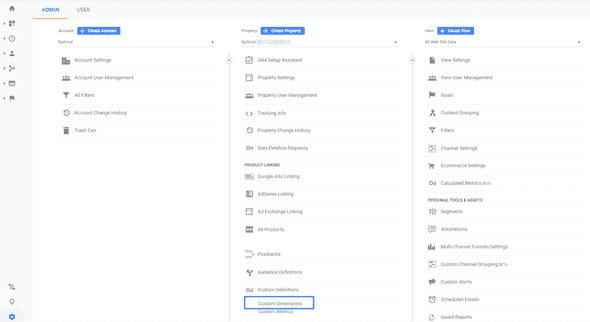
Let’s go into your Google Analytics Dashboard Admin Settings and click on Custom Definitions > Custom Dimensions.
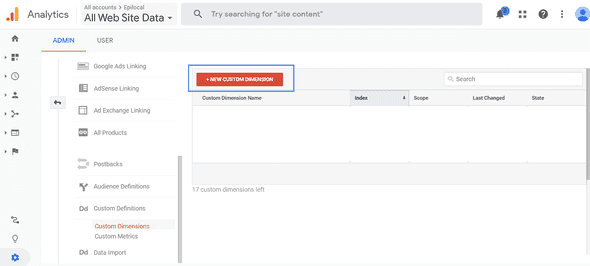
Currently Google Analytics isn’t expecting to receive any Custom Dimensions, so you will have to add your Custom Dimensions here. Click “+ New Custom Dimension”
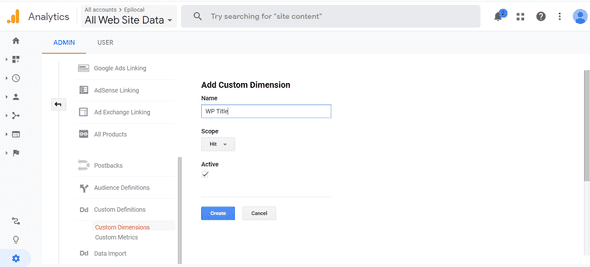
Now you simply type in the title of the dimension - remember they need to be in the same order you entered in Google Tag Manager! The scope will be Hit for all of these dimensions.
And finally press create.
And now, just repeat for all of your Custom Dimensions - again remember to keep them in the same order.
Events and Goals
Another powerful customization option that Google Analytics offers, is the ability to create custom Events and Goals. What this means, is that you can tell Google Analytics to create a tracking “event” based on many different interactions someone could have with your website. For example, you can create an event that will fire every time someone clicks a specific button on your site. Or as we will see in our example, you can create an event for every time someone subscribes to your email newsletter.
This ability is even more powerful when it is combined with Google Analytics Goals. With Goals, you can tell Google Analytics which Events you want someone to take when they enter your site - again, for example, subscribing to your newsletter. This then opens up a wealth of different things you can monitor like:
Which articles are getting you the most newsletter sign ups?
or
What type of readers are most likely to become subscribers?
And since we already have Google Tag Manager set up, our configuration can all be done there and inside Google Analytics, no code required.
Events in Google Tag Manager
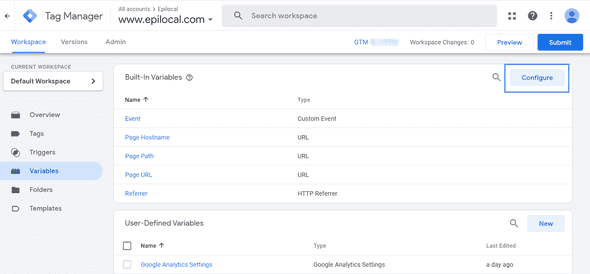
The first step in setting up our Events, is to enable some additional Built-In Variables that already come with Google Tag Manager, they are just not turned on by default. So we will go to the Variables tab and select Built-In Variables > Configure.
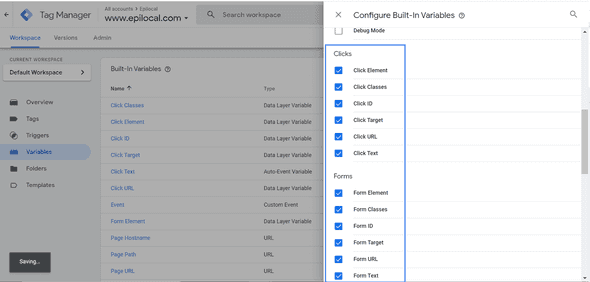
Now we will scroll down to the sections “Clicks” and “Forms” and we will check all of the options in each of those categories. This is essentially giving Google Tag Manager more options for triggering, based on actions (like clicks) that take place across our website. (we won’t use all of these options in this guide, but they are useful to have set-up anyway)
For the purposes of this guide, we want to set up an event that will fire whenever someone signs up for our newsletter, so we will do that in two different ways. (you can pick either one)
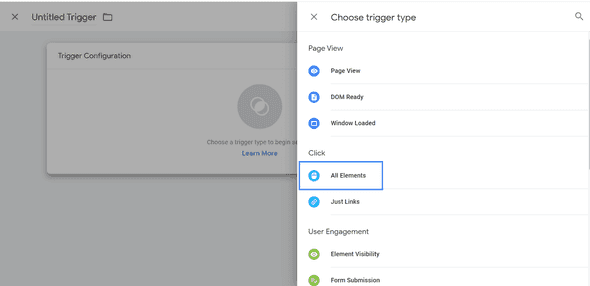
The first way we could do it, is we can set up an event to fire any time somebody clicks on Subscribe button. To do this we will go to the Trigger tab and select New. Then we will configure the trigger type where we will choose Click > All Elements.
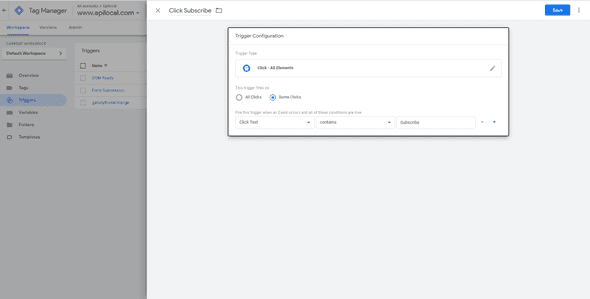
Then we will call our new event “Click Subscribe” and we will configure it so that it only applies to “Some Clicks.” We then have lots of different options to choose from to specify which clicks Google Tag Manager should use, but for our purposes here we will select “Click Text” that “contains” the word “Subscribe.”
This is doing exactly what it sounds like: the event will fire anytime someone clicks on a button on our website that has the word Subscribe in it. And that’s it, we can just hit save now.
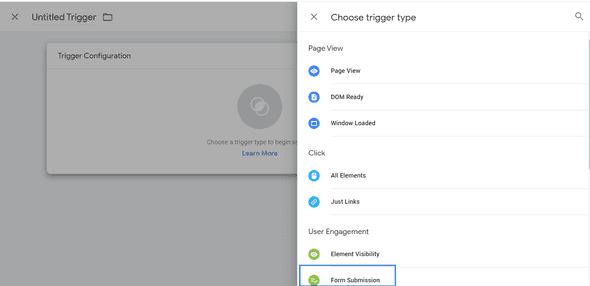
The other option is we could have an event to fire whenever a form is submitted. To do this we will go to the Trigger tab and select New. Then we will configure the trigger type where we will choose “Form Submission.”
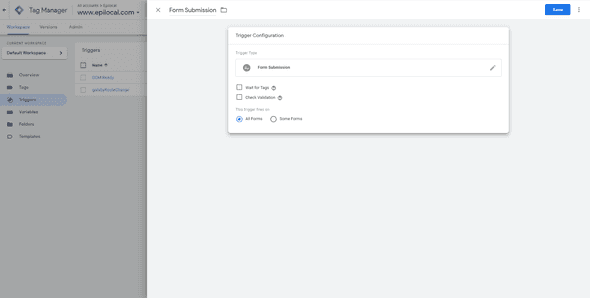
Now we will name our trigger Form Submission and we will leave everything else as it is. If you have multiple forms on your website, we could be even more specific like we were on the click event, and choose which forms this event applies to by things like ID or name.
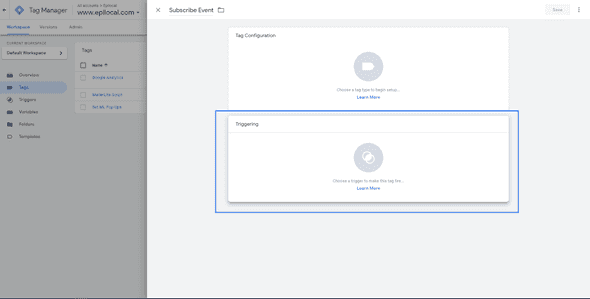
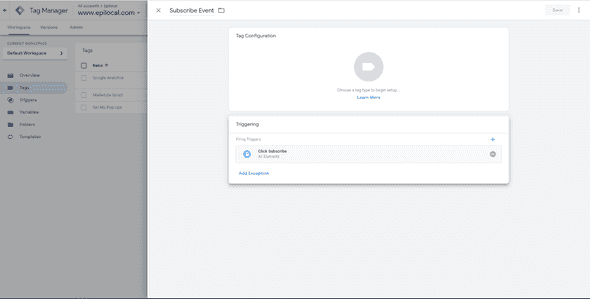
Now we need to create a new Tag that uses this trigger we just created. So go to the Tag tab on the left menu. Then you will click on Triggering.
Then you will simply select the Trigger you just created. In this case we will take “Click Subscribe.”
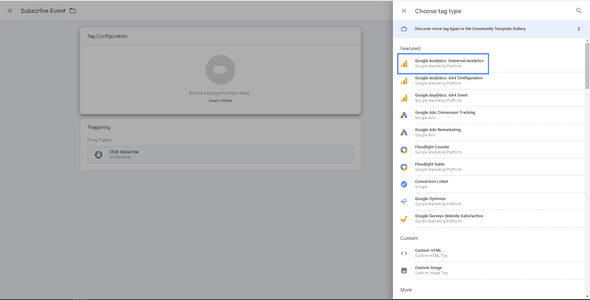
Then you will go to Tag Configuration and you will pick Google Analytics Universal Analytics, same as we had done during our initial set up.
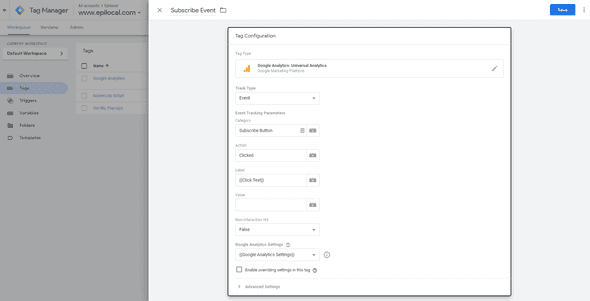
Then you will select “Event” under Track Type and give values to the Category, Action and Label fields. These fields control the data you will see in Google Analytics whenever this event fires, so you can either manually type in something or use a variable.
In this case we will set it up as follows:
- Category: Subscribe Button - so we know which button has the action being done to it
- Action: Clicked - so we know the button is being clicked
- Label: {{ClickText}} which means Google Tag Manager will take whatever the text inside the button is - this is useful in case you have multiple buttons with different text, this will help you keep them separate
Finally under Google Analytics Settings just select {{Google Analytics Settings}} which means everything else will be as you set up previously.
Now as a last step, you can just check to see if your new events are working before deploying them. You can use the preview feature on the Google Tag Manager dashboard to click the items on your website and see if the events are firing in real-time. If everything looks good, you can go ahead and submit your updated tags for deployment.
Goals in Google Analytics
Now that we have our events set up, we just need to tell which events we want Google Analytics to track as Goals on our website.
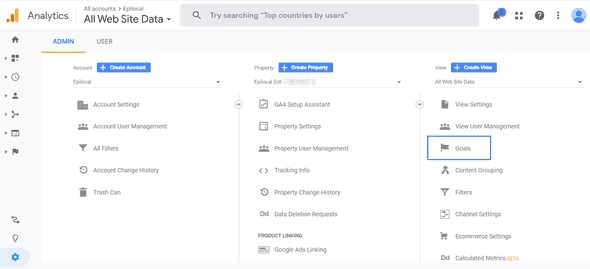
First go to Goals in the Admin Dashboard in Google Analytics:
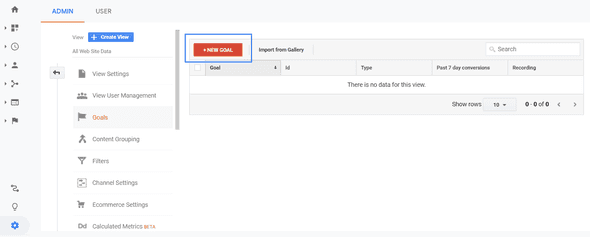
Then select “New Goal”.
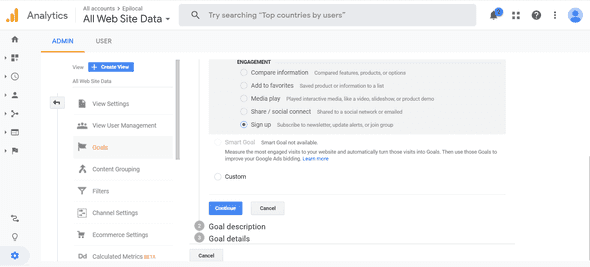
Now you can select Sign-up or Custom, from the list of Goal types. (The only difference is Google will fill out the name of the Goal automatically if you select Sign up)
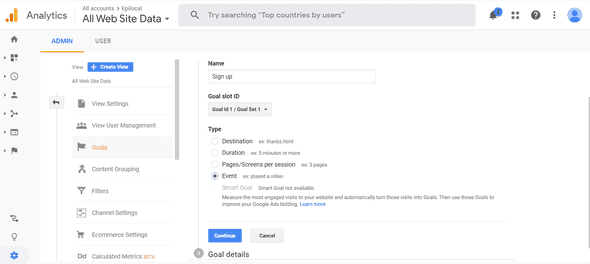
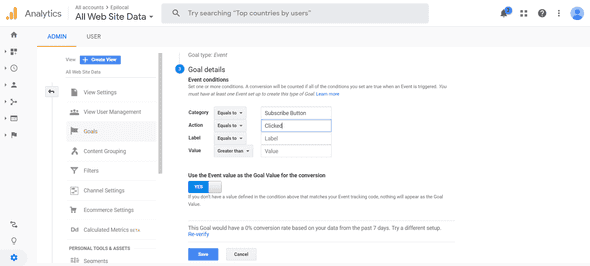
Here we have selected Sign up and you can see that the Goal is automatically named Sign up. Now we will just select “Event” and continue.
Finally, we will configure the event so that the Category and Action match the same way we configured it in Google Tag Manager. So Category “Equals” to “Subscribe Button” and Action “Equals” to Clicked.
Custom Segments
As part of their News Consumer Insights Playbook, Google recommends tracking readers through their Engagement funnel by focusing on three Customer Segments:
- Casual Readers - readers who come to the site once and don’t come back
- Loyal Readers - readers who come back at least once but less than 15 times
- Brand Lovers - readers who come to your site more than 15 times
They have a whole dashboard for tracking readers through the funnel and generating insights, but for many publishers, that is probably more information than required.
Instead, we will show a lightweight approach here where you can set up the same customer segments, using Google Analytics’ Custom Segment feature.
The benefit of using the Custom Segment feature is that you can then split your data between the users that fall into each of these 3 groups and compare them to each other, so you can answer questions like:
- What content appeals to our most loyal readers?
- What content brings in the most new readers?
- What authors are writing content that converts the most casual readers to subscribe to our newsletter?
And the good part is, it is actually really easy to set up.
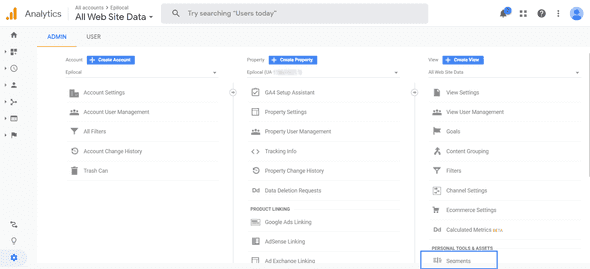
First, go to your Admin Dashboard in Google Analytics and select Segments.
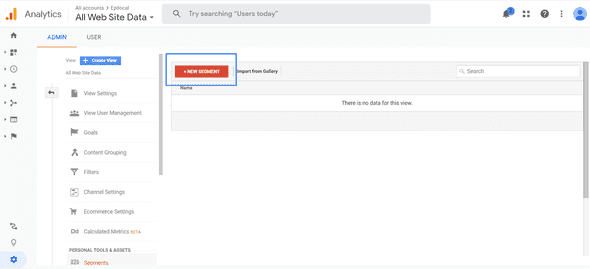
Currently you will see no Segments are set up yet, so go ahead and click “New Segment.”
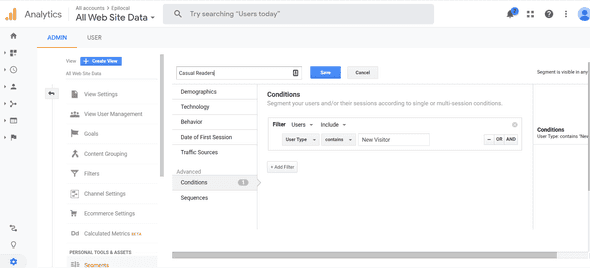
Now you will set up the first segment: Casual Readers, so call it that and then click on Advanced > Conditions. Here you will make sure that by Filter it says Users and Include and then underneath you will pick User Type from the drop-list and say that it should “contain” “New Visitor.”
This essentially tells Google Analytics that anyone who is coming to our site for the first time will fall into this category of “Casual Readers.” Then press Save.
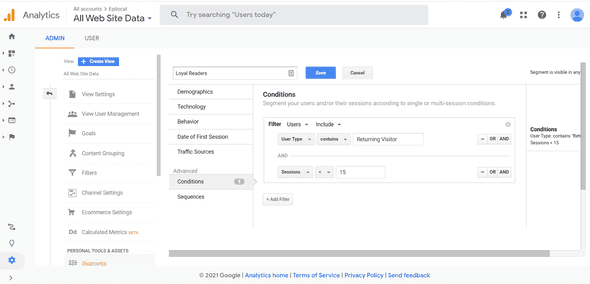
Next we will repeat the same process for the second segment: Loyal Readers, so call it that and then click on Advanced > Conditions. Here you will make sure that by Filter it says Users and Include and then underneath you will pick User Type from the drop-list and say that it should “contain” “Returning Visitor.” Then you will click on the AND button to the right and it will give you another field. Here we will select “Sessions” from the drop-down list and select < 15. (less than 15)
Now we are telling Google Analytics that anyone who is coming to our site more than once but less than 15 times will fall into this category of “Loyal Readers.”
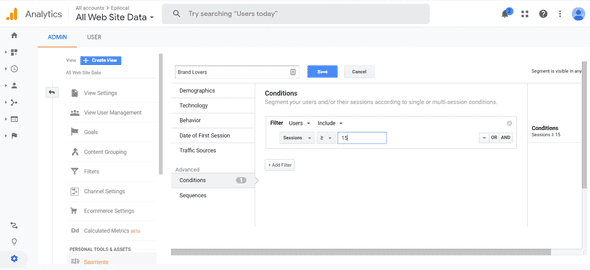
Finally, we will repeat the same process for the third segment: Brand Lovers, so call it that and then click on Advanced > Conditions. Here you will make sure that by Filter it says Users and Include and then underneath you will pick Sessions from the drop-down list and select >= 15. (greater than or equal to 15)
For this last category of “Brand Lovers,” we are telling Google Analytics to take anyone who is coming to our site more than 15 times.
And that’s it - now you’re all set up and you can select these different segments for all of the different data views that Google Analytics offers.
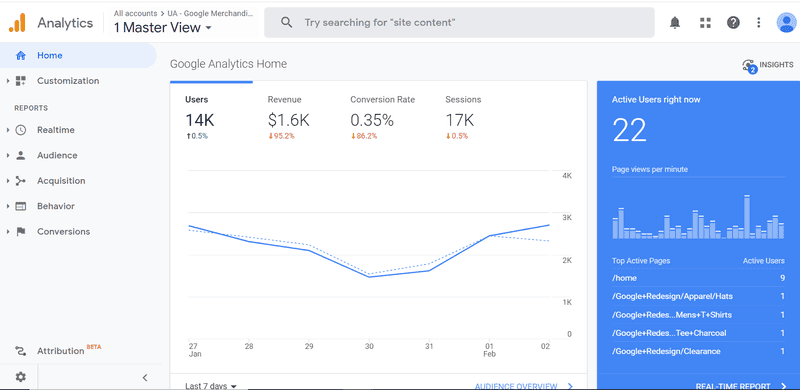
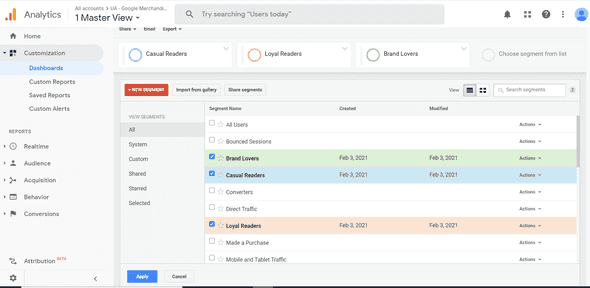
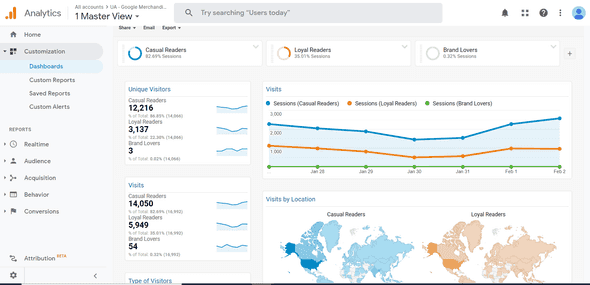
Here’s an example of a dashboard that comes with the Google Analytics demo account so you can get a feel for the different comparisons you can make.


![Connect Plausible Analytics to Looker Studio [Free Template]](/static/02809ee25af3e099ec53e8c6b0bf26db/b6d36/connect-plausible-ds.png)
