Whatever your business may be, content marketing without a doubt will play some role. And anyone who is doing content marketing will know the importance of ranking highly in search engines and SEO.
A big part of the SEO equation is content creation but it is not the only thing you should be focusing on. A good content marketing strategy will also involve going back through your existing content and making sure that it is still performing and giving you SEO value. If it’s not, you can then take action to improve your existing content.
This is where a Content SEO Audit should be a vital part of your content marketing toolbox.
In this step-by-step guide, we will cover:
- What is a Content SEO Audit
- Why you should use Looker Studio (formerly Data Studio) to do a Content SEO Audit
- Step-by-step how you can do a Content SEO Audit in Looker Studio for free
- How you can take action on your Content SEO Audit
If you want to skip ahead and see the finished Content SEO Audit report in Looker Studio, you can check it out here.
What is a Content SEO Audit
A Content SEO Audit is the process of analyzing all of the content on your site based on the key factors that influence search engine ranking or SEO. Since we are focusing our audit on content, we are not looking at technical SEO factors like site load speed, but instead we are looking at things like traffic, engagement, backlinks, search volume and ranking.
By comparing all of your content based on these factors, you can then take action by optimizing under-performing content, leveraging high performing content in different ways, or dropping some content altogether.
Once you get a single view of your data, a lot of these content decisions can seem pretty obvious. So really, getting your data together in one place is on of the most difficult parts of doing an extensive Content SEO Audit. To help with this data aggregation process, we recommend using Google Looker Studio.
Why use Looker Studio to do a Content SEO Audit
Looker Studio (formerly Google Data Studio) is a great, free analytics tool that enables you to combine data from multiple sources and use them in custom analysis or regularly updated dashboards.
In this situation, we are performing a one-off analysis, but it makes sense to use Looker Studio since we have multiple data sources where we want to combine our data. Not only that, but we will want to do regular content audits, and as a result, we can save ourselves some set-up time since we can re-use our Content SEO Audit report template over and over again in the future.
To create our Content SEO Audit report, we are going to be pulling data from three different sources into Looker Studio:
- Our analytics platform - either Google Analytics or Plausible Analytics
- Google Search Console
- Ahrefs
For analytics, we will be using Plausible Analytics in our example, (taking advantage of our Plausible Analytics connector for Looker Studio which has a free trial) but you could use similar metrics from Google Analytics and the free built-in connector that Looker Studio has for GA.
For Google Search Console, we will be using the native connection that Looker Studio has with Search Console. And finally, we have two options to pull in Ahrefs data:
- The Ahrefs connector for Looker Studio (this comes with paid Ahrefs plans only)
- A CSV export that you can download from Ahrefs free version and then upload into Looker Studio
Since our aim is to do this Content SEO Audit for free, we will do things the harder way and go with the CSV export from Ahrefs.
How to do a Content SEO Audit in Looker Studio
Now that we know which data sources we are going to be using, let’s get all of our sources connected to Looker Studio.
Let’s start off with our analytics platform. Again for our example, we are going to be using Plausible Analytics, but this could also be done using Google Analytics.
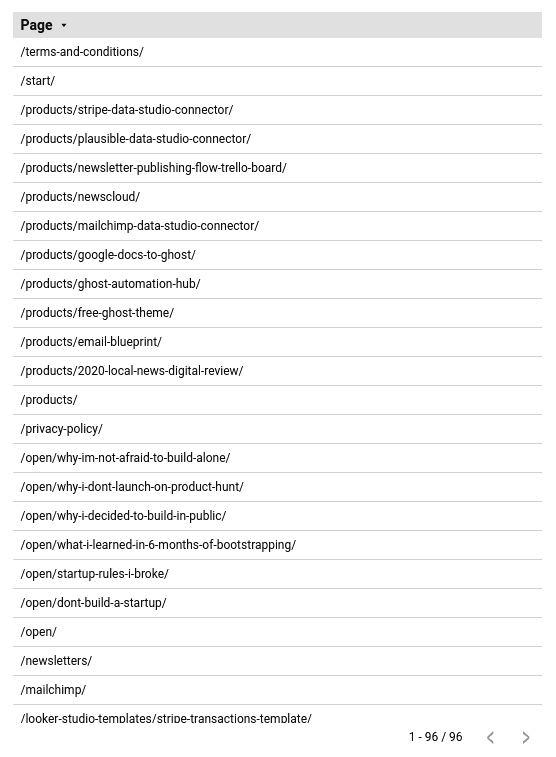
Once we get our data source connected (more details on connecting Plausible Analytics to Looker Studio here), we can simply choose Page as a Dimension and see all of the URL’s that we have Plausible data for:
This will give us a list of all of our site’s pages with the URL shortened to a slug. Since we are going to want to focus on our blog content in this SEO audit, let’s add a filter to our data where we look for Contains /blog/ in our Page Dimension:
We will also add a filter on Source to ensure that all of the metrics we are going to pull apply only to traffic that came from Google:
(Note: if you wanted to include other search engines in your analysis like Bing or DuckDuckGo, you could change this filter to use IN instead of Equals)
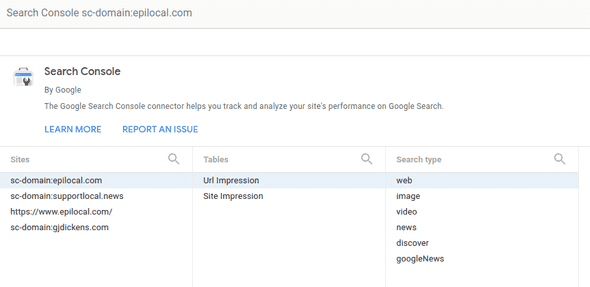
Next, let’s bring in our Google Search Console data. Since Search Console and Looker Studio are both Google products, they have a very simple and easy-to-use, native connection. All we need to do is:
- Pick Search Console as a new data source
- Give Looker Studio permission to access our Search Console data
- And finally pick our site, using the URL view and selecting Web search data
If we then select Landing Page as a Dimension, we will now see a list of all of the indexed page URLs on our site. The first thing we will notice is that Search Console uses full URLs while Plausible Analytics uses slugs.
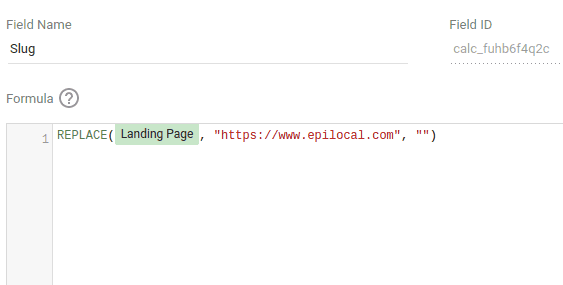
This means we will need to create a custom dimension where we shorten our Search Console URLs to slugs. This will need to be a report-level custom field so we can reference the data field elsewhere in our report.
We will do this by clicking the edit button on our data source and then Add a Field. Once the field editor is open, we will want to use the Replace formula to replace the path our our website with and an empty space. We will call our new custom field Slug and altogether it will look like this:
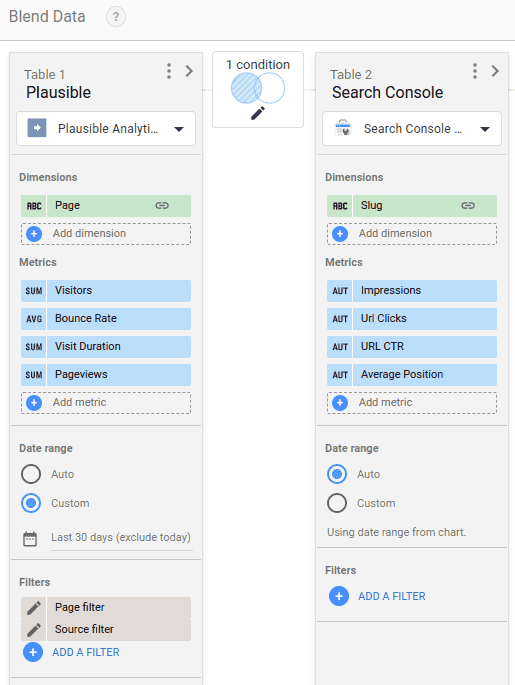
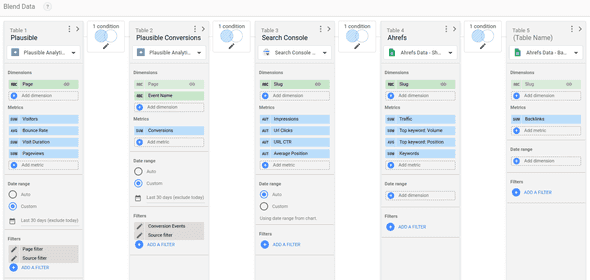
Now we can go ahead and blend our data source together using this Slug field. We will do this by going to Manage Data Blends, creating a new blend, and selecting our Plausible Analytics and Search Console data sources.
Once we have done that, we will select our slug field to join on and then we will take a few metrics from each of our sources:
- Plausible Analytics - Visitors, Bounce Rate, Visit Duration, Pageviews
- Search Console - Impressions, URL Clicks, URL CTR, Average Position
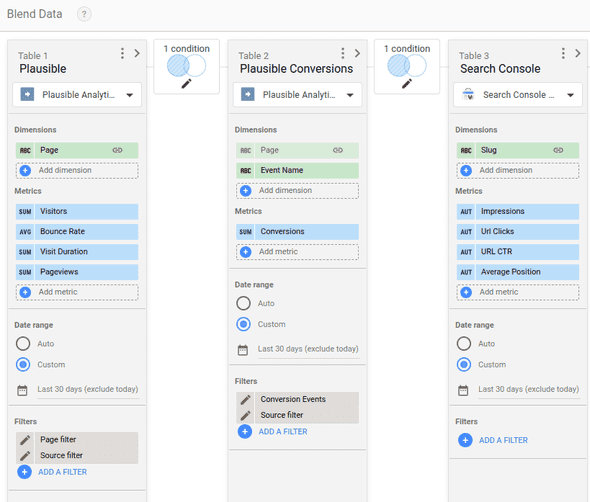
We can also add conversions by adding another layer to our blend using Plausible Analytics data that filters on Event Name for whatever conversion event we are interested in. For our example, we will just filter out ‘pageview’, which means we are counting any event in Plausible that is not a simple pageview as a conversion.
To do this, We will join this data using Page as our join field and add our filter, taking the Visitors metric which tells us how many unique conversions occurred on our page. We can then rename that metric Conversions.
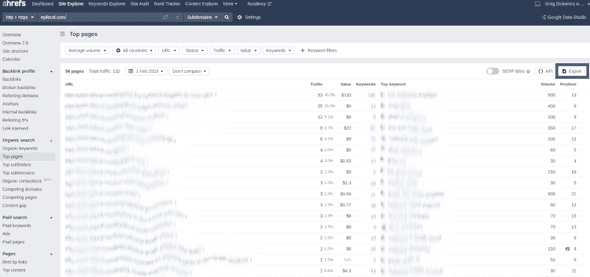
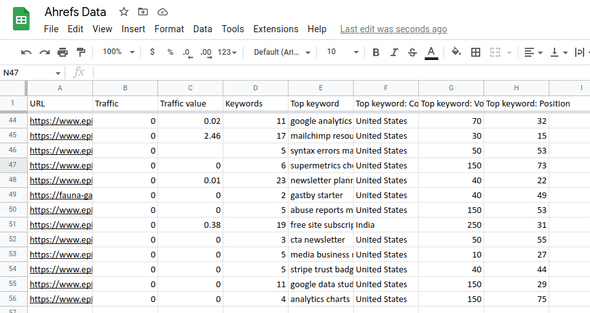
Finally, we just need to get our Ahrefs data into our Looker Studio blend. To do this, we will log into our free Ahrefs account and navigate to Organic Search > Top Pages. Here we can download a CSV file of all of our pages with the accompanying Traffic and Search Volume metrics.
Note: when clicking Export, be sure to select CSV (UTF-8) as this is the format that Looker Studio uses
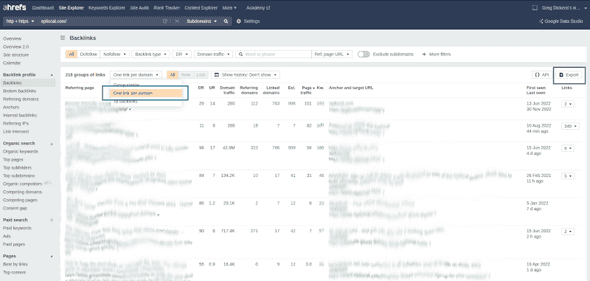
While we are in Ahrefs, we also want to grab an export of all of the backlinks to each of our pages. We can do that by going to Backlink Profile > Backlinks. Then we should make sure that ‘One link per domain’ is selected and we will again click Export.
Now to get this CSV data into Looker Studio, we have two options:
- We can upload it directly using the File Upload connector
- Or we can copy and paste it into Google Sheets and use the Google Sheet connector
Since we want our report to be as re-usable as possible, we will go with the second option. This is because we want to avoid creating a new data source every time we upload a new CSV file into Looker Studio. By using Google Sheets instead, we can link our sheet as a data source one time and then simply update the data inside this sheet whenever we are ready to do an updated Content SEO Audit.
Let’s go ahead and copy our Top Pages data from Ahrefs into Google Sheets which will look something like this:
We can do the same with our Ahrefs Backlinks data, on a second tab.
Now we will add a new Data Source into Looker Studio, selecting the Google Sheets Connector, and setting it up like this:
In our configuration, we are referencing our Top Pages sheet and noting that we have headers in our file. And just like that, we will see our Ahrefs data available in Looker Studio.
Let’s repeat the same process for our Backlinks data, this time picking the tab where we pasted our backlinks data. Now we should have all of our Ahrefs data loaded into Data Studio.
Similar to Search Console, Ahrefs uses full URLs, so we will need to use the same formula again to create a custom field for Slug in both of our new Ahrefs data sources. Once we do that, we can finish up our data blend by joining on Slug and taking a few metrics from our Ahrefs Top Pages data like Traffic, Top Keyword Volume and Top Keyword Position. Then we will do one final blend, by adding in our Backlinks data source joining on Slug and taking the Backlinks metric.
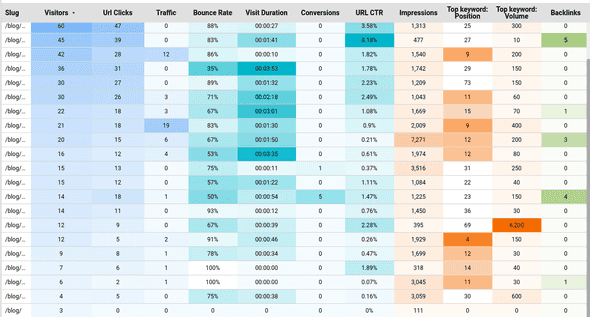
Now that we have our data all blended and ready to go in Looker Studio, we can pull in all of our metrics to start our analysis. Let’s just create a simple table that has our Slug as the only dimension and then the following metrics:
- Visitors
- URL Clicks
- Traffic
- Bounce Rate
- Visit Duration
- Conversions
- URL CTR
- Impressions
- Top Keyword Postion
- Top Keyword Volume
- Backlinks
Let’s color code these fields based on what they tell us. Starting with our traffic metrics, let’s make Visitors, URL Clicks and Traffic blue, by going to Style and scrolling down to Metrics > Color. You can select the individual color for each metric, so in this case we will make the first 3 metrics blue:
Then let’s group Bounce Rate, Visit Duration, Conversions and URL CTR (click-through rate) together because they are all about Engagement. After that we can put Impressions, Top Keyword Position and Top Keyword Volume together since they are about Ranking/Volume.
Finally, we will give Backlinks a its own color, since it is important to understand the SEO value that our posts have.
Once we’ve done all that, we end up with a final Content SEO Audit report that looks something like this:
Take action on your Content SEO Audit report
Based on our Content SEO Audit report in Looker Studio, we can now start analyzing our blog posts. We will want to compare the SEO performance of each post across every category, keeping in mind that blog posts should not be expected to perform well across every SEO category. For example, we might see that some of our best posts are not actually targeting the highest volume keywords, but they are ranking better.
While we may have some posts that don’t do great overall traffic numbers, they may drive engagement and get us conversions. What we are looking for are opportunities where we can either improve posts or get rid of them altogether. (especially if they are performing poorly in every single SEO category)
Here are some of the options you might decide to take on your content based on your SEO audit:
- No Action - if a blog post is ranking for a high volume keyword, is bringing in lots of traffic and has lots of backlinks
- Optimize - if a blog post is not ranking, but targets high volume keywords it might be worth a re-write
- Promote - if a blog post is getting lots of traffic but covers a niche topic that has limited search volume, it might be worth sharing with other sites in that niche that could link back to you
- Repurpose - if a blog post has a lot of quality content but just isn’t working for traffic, engagement or backlinks you could unpublish it and use it in the future as newsletter content, an ebook, or some other type of non-blog post content
- Unpublish - if a blog post is low on all SEO metrics and is thin on content, it may increase the SEO value of your other posts if you take it down altogether (and of course if there’s anything worth saving from the post you can always repurpose it)
This is just scratching the surface of what you can do with your Content SEO Audit. Once you’ve done the hard work of getting your Content SEO Audit report together, there are lots of other insights that you will take away that can help you improve your content marketing and SEO strategy going forward.
Start your free trial
Connect Plausible Analytics to Looker Studio in less than 5 minutes
Try free for 14 days





![Connect Plausible Analytics to Looker Studio [Free Template]](/static/02809ee25af3e099ec53e8c6b0bf26db/b6d36/connect-plausible-ds.png)
