All content businesses and content marketers have the same goal in the end: get more sales, members, subscribers, or whatever else drives your revenue. For many businesses, this crucial conversion step takes place in Stripe. One of the reasons Stripe is so popular is that it gives you a powerful suite of payment tools while keeping things simple.
Along these lines, Stripe provides an array of custom reporting options inside the platform itself. However, these reports can be limited in terms of how you can combine different metrics and what fields you can look at together. You can get around these limitations by connecting Stripe to Google’s free data visualization platform, Looker Studio.
Not only does this extend what you can do with Stripe reporting, it also allows you to combine your payment and subscription analytics together with web analytics, email marketing, content management systems (CMS) and any other data that is important to your business.
This is what we are trying to help content creators and marketers do here at Epilocal. We are building a platform that makes it easier to bring together the data that you need across all of the platforms that touch your content.
In this step-by-step guide, we will show you how you can connect Stripe to Looker Studio. First, we will look at a manual approach that is 100% free. Then we will look at how you can automate the connection by using our platform. Finally, we will give you a taste of what you can do with Stripe data once it is inside Looker Studio.
Manually Connecting Stripe to Looker Studio
If you want to manually upload data to Google Looker Studio, the most straightforward way to do it is with a CSV file. This works well for platforms that either don’t have an automated way to connect to Looker Studio or that you would prefer to upload manual data for some reason. (e.g. you only need a one-time snapshot of data)
The primary advantage of connecting to Looker Studio manually is that it is 100% free. The downsides are that your data will not refresh automatically, the available fields will be more limited, and updates will require recurring manual effort on your part.
Now that we’ve covered the pros and cons of this approach, let’s see how we can manually connect our Stripe data to Looker Studio
First, we will start in our Stripe dashboard and go to Payments.
Then click ‘All transactions’, which will give us a list of all Stripe charges and payouts.
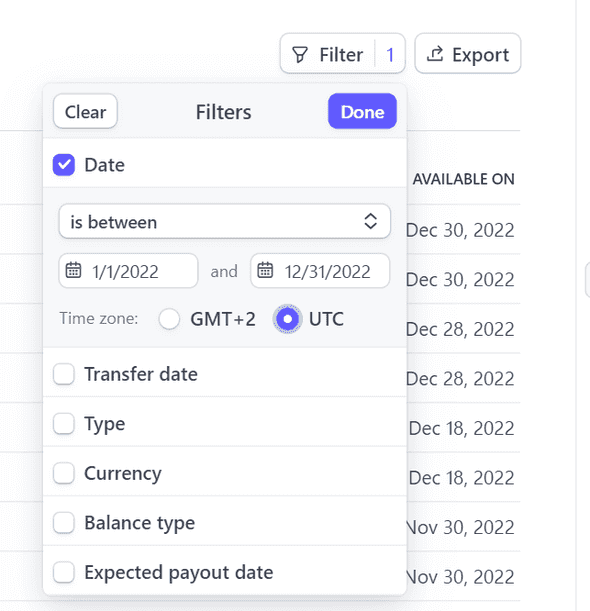
We can then filter and export this list of Stripe transactions based on the date range that we want. In our case, we are going to export all transactions from the year 2022.
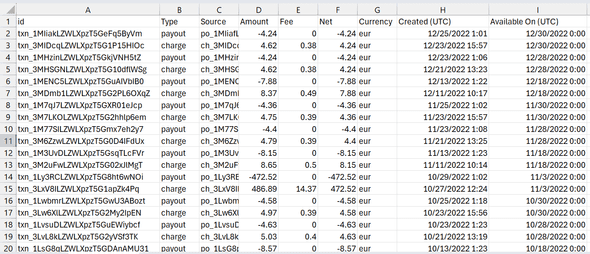
Then we can simply press ‘Export’ next to the filter button and our CSV file will be downloaded. Let’s have a look inside and see what it looks like.
You can see that we have a list of Stripe charges and payouts with following fields:
- ID - Stripe transaction ID
- Type - charge or payout
- Source - an ID for the relevant Stripe charge or payout
- Amount - gross transaction amount
- Fee - Stripe fee for the transaction
- Net - gross amount minus the fees
- Currency - currency of the transaction
- Created - date and time the transaction was created
- Available On - date and time the transaction became available
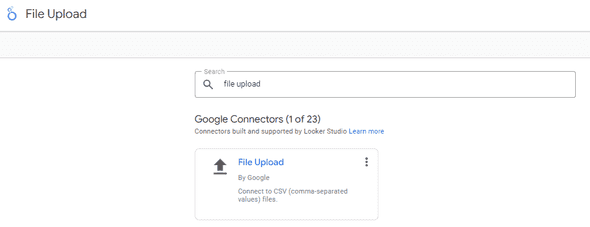
To manually upload this CSV file, in Looker Studio we will go to ‘Add New Data Source’ and select the ‘File Upload’ option.
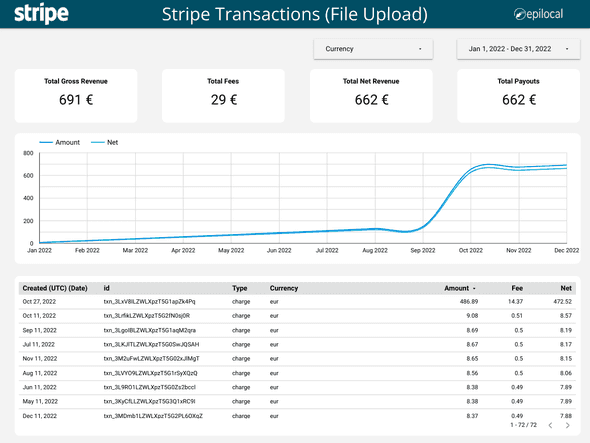
We’ve created a free Looker Studio template for Stripe transactions using this File Upload approach. This template automatically maps to the naming conventions of the Stripe CSV export and does not reference any fields that are not available in the file.
You can get started with the template here by simply making a copy in Looker Studio and using your own File Upload data source -> Free File Upload Stripe Transaction Template
Stripe Looker Studio Connectors
Manual file uploads work fine in some situations, but in many cases you will find that you need fields that are not included in the file or that continuous manual uploads to keep data fresh are not worth your time. At this point, it makes sense to use a Looker Studio connector.
A Looker Studio connector is a small software service that connects to a data source’s API (in this case Stripe) and pulls that data into a Google Looker Studio report based on the fields and date range that you select.
Google provides several native connectors for Google data sources like Google Analytics, Google Ads, Google Sheets as well as the File Upload option that we used in our manual approach.
Outside of the Google connectors, there are also Partner Connectors which are developed either directly by the company that provides the data or by platforms that connect multiple data sources to Looker Studio. At Epilocal, we are one of these platforms that connect multiple data sources, focusing on all the most important data sources used by content businesses and content marketers.
You can browse all of the available Looker Studio connectors in Google’s connector gallery.
For the purposes of our guide, we will be using our own Stripe Connector for Looker Studio.
How to Connect Stripe to Looker Studio Automatically
To connect Stripe to Looker Studio using our connector, you will first need to sign up for a free trial.
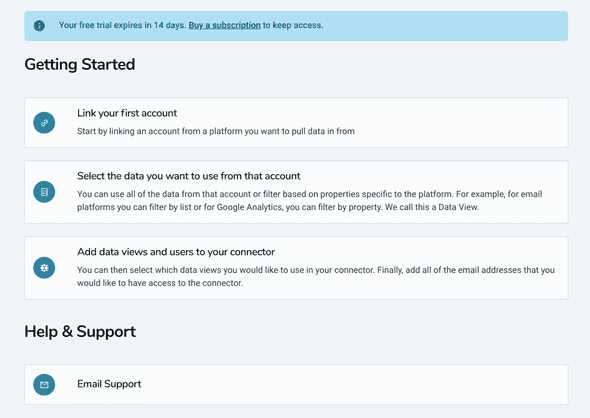
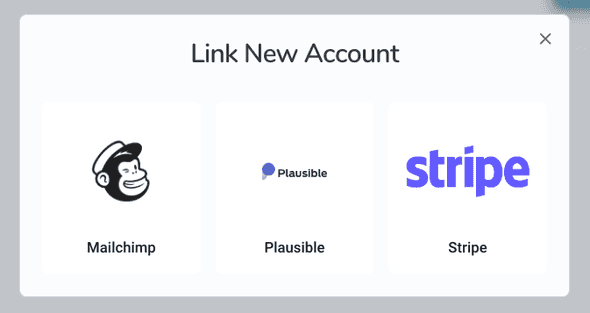
Once you’ve signed up for a free trial and logged in, you will see a dashboard where you can add data sources by linking your various software accounts.
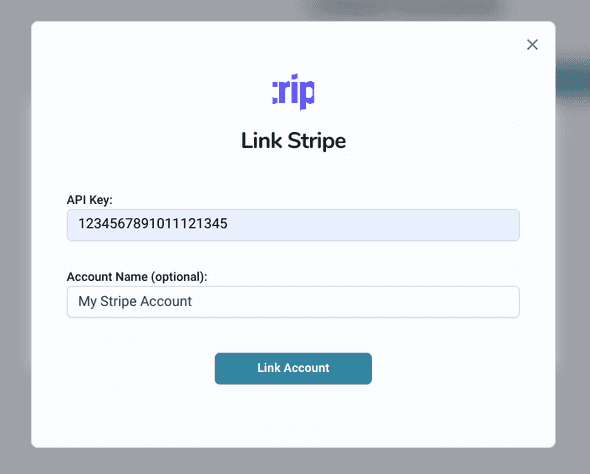
In order to link your Stripe account, you simply need to follow the prompts and enter a Stripe API key.
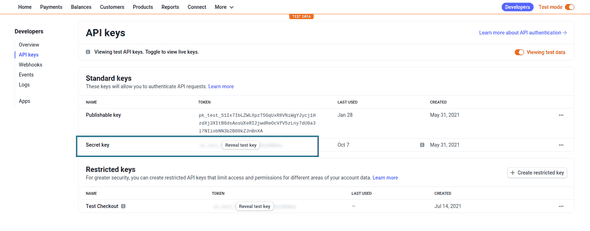
To find your Stripe API Key, you will simply need to go into your Stripe Dashboard and click on Developers and then API Keys. Here you will find your API key where it says Secret Key.
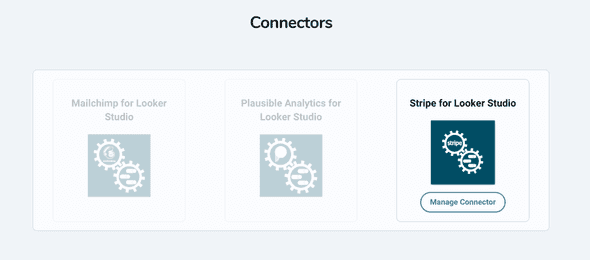
Once you’ve entered that API Key to link your Stripe account, you can go to Use Data > Connectors and you will see that the Stripe Looker Studio connector is now active.
Before moving over to Looker Studio you just need to make sure that the Google email address you use to access Looker Studio is added as a connector user. You can do this by clicking on Manage Connector and scrolling down to Users.
Then we can move over to Looker Studio where we will create a new data source using our Stripe Connector. (you can do that by following this link or by searching for Epilocal in the Looker Studio connector gallery)
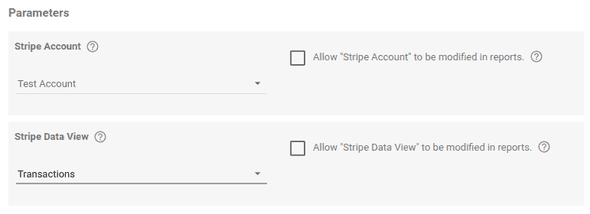
After authorizing the connector by logging into your Google account, you will see drop-down lists that prompt you to select your Stripe Account and Stripe Data View.
Under Stripe Account we will select the account that we just linked over in the Epilocal dashboard and under Stripe Data View we will select Transactions.
Then after following the remaining prompts, we will have our Stripe data available to us in Looker Studio. The best part is that this connection will automatically update as we have new data in Stripe.
If you want to get started right away with a template, you make a copy of our Free Stripe Transactions Template and simply select your newly added Stripe account as the Data Source when prompted by Looker Studio. (this is the same template as in the manual approach, with the only difference being that the data fields have different names to accommodate the connector as opposed to the headers in the CSV export file)
Using Stripe Data in Looker Studio
Now that Stripe is connected to Looker Studio, let’s see how we can use our Stripe data to create custom reports. To do this we will walk through the elements of our free template.
First, let’s look at the scorecards at the top of the report.
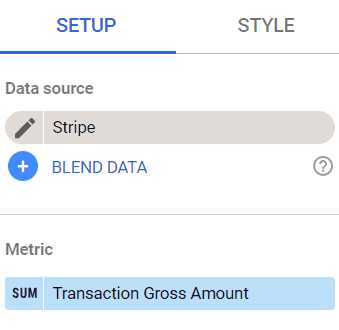
These are 4 separate Looker Studio Scorecard elements which we can add by going to Insert > Scorecard. Then, we just need to select the metric for each of these. We can do that in the right-hand toolbar under Setup, and for the first Scorecard we will select the metric ‘Transaction Gross Amount’.
Now we will also have to set a filter, because in Stripe the transactions will also include payouts with negative amounts which basically cancel out all of the revenue over time. We will filter on ‘Transaction Type’ = ‘charge’, to ensure that this Scorecard is only displaying the total amount of charges, rather than charges minus payouts.
The only difference between the other Scorecards is the metrics and filters being used. For each of the others, we will select the following metrics from our connector:
- Total Fees -> Transaction Fee, No filter
- Total Net Revenue -> Transaction Net Amount, Filter ‘Transaction Type’ = ‘charge’
- Total Payouts -> Transaction Net Amount, Filter ‘Transaction Type’ = ‘payout’
Next, let’s see how we can create the chart in the middle of our template.
First, we will create our chart by going to Insert > Time series chart. Next, we will go to the right-hand sidebar and change our chart to the type Smoothed time series chart.
Then, we will configure our chart metrics and dimensions in the right-hand sidebar under Setup. Under Dimensions, we will select ‘Transaction Created’ and then we will click on the left part of the field so we can change the formatting. We will then select Date & Time > Year Month.
After, we will add our two metrics:
- Transaction Gross Amount
- Transaction Net Amount
And finally, we will add the same filter to our chart that we were using before: ‘Transaction Type’ = ‘charge’. This will ensure that our chart doesn’t swing up and down as revenue is paid out over time.
Lastly, let’s look at the table at the bottom of our report.
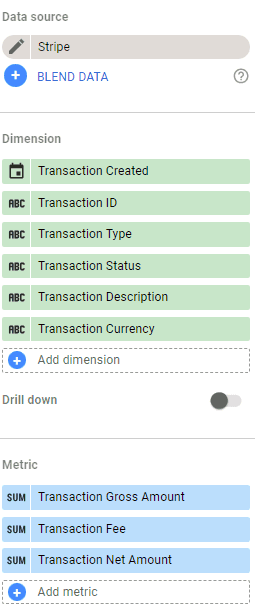
To create this, we simply need to go to Insert > Table. Then in the Setup sidebar on the right, we just need to add all of our Dimensions and Metrics which are:
- Transaction Created (Dimension)
- Transaction ID (Dimension)
- Transaction Type (Dimension)
- Transaction Status (Dimension)
- Transaction Description (Dimension)
- Transaction Currency (Dimension)
- Transaction Gross Amount (Metric)
- Transaction Fee (Metric)
- Transaction Net Amount (Metric)
Once you’ve added all of the dimensions and metrics, it will look like this:
And with that you have the key elements of our free Stripe Transactions template.
Wrapping Up
In this article we looked at:
- Manually connecting Stripe to Looker Studio along with the limitations of this approach
- Automatically connecting Stripe to Looker Studio using our connector
- How you can use Stripe data in Looker Studio
We hope that you found this guide useful. Here are the links to the free templates one more time:
Start your free trial
Connect Stripe to Looker Studio in less than 5 minutes
Try free for 14 days






![Connect Plausible Analytics to Looker Studio [Free Template]](/static/02809ee25af3e099ec53e8c6b0bf26db/b6d36/connect-plausible-ds.png)
